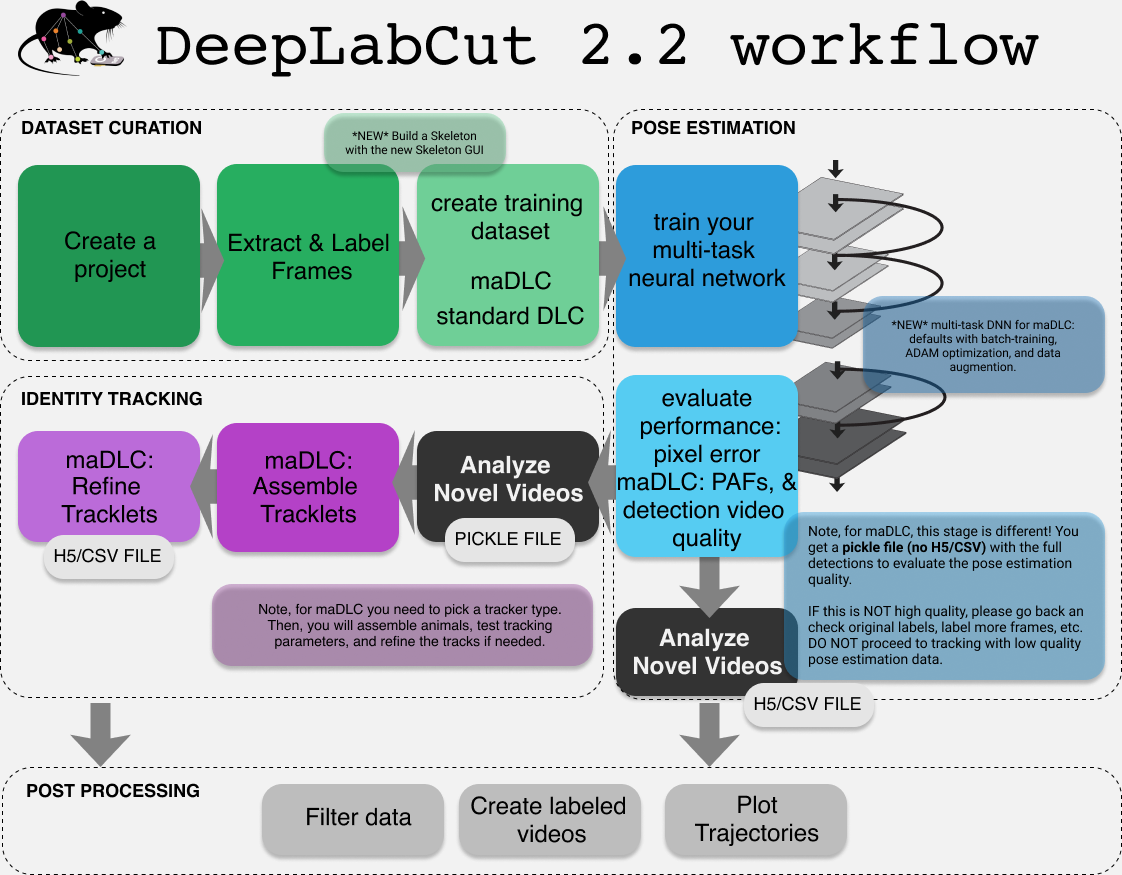
Creating your multi-animal pose tracker#
Multi-animal pose tracking workflow#
The workflow for multi-animal DeepLabCut is a bit more involved. You should think of maDLC requiring four parts ⚙️:
(1) Curate annotation data that allows you to learn a model to track the objects/animals of interest.
(2) Create a high-quality pose estimation model (this is like the single-animal case)
(3) Track in space and time, i.e., assemble bodyparts to detected objects/animals and link across time. This step performs assembly and tracking (comprising first local tracking and then tracklet stitching by global reasoning).
(4) Any and all post-processing you wish to do with the output data, either within DLC or outside of it.
🔥Thus, you should always label, train, and evaluate the pose estimation performance first. If and when that performance is high ⚡, then you should go advance to the tracking step (and video analysis). There is a natural break point for this, as you will see below.

For detailed information on the different steps in the workflow, please refer to the multi-animal user guide: maDLC user guide.
GUI (Graphical User Interface):#
Use python -m deeplabcut to launch the GUI.
Follow ➡️ the tabs in the GUI.
Check out our tutorial Youtube tutorial for maDLC in GUI
COLAB:#
Python commands 🐍:#
Import deeplabcut
import deeplabcut
(1) Create a project 📂
project_name = "cutemice"
experimenter = "teamdlc"
video_path = "path_to_a_video_file"
config_path = deeplabcut.create_new_project(
    project_name,
    experimenter,
    [video_paths],
    multianimal=True,
    copy_videos=True,
)
NOTE: Make sure to specify the absolute path to the video file(s). It is quickly obtained on Windows with ⇧ Shift+Right click and
Copy as path, and on Mac with ⌥ Option+Right click andCopy as Pathname. Ubuntu users only need to copy the file and its path gets added to the clipboard.
Next, you can set a variable for the config_path: ‘Full path of the project configuration file*’
(2) Edit the config.ymal file to set up your project
NOTE: Here is were you will define your key point names and animal IDs. Also you can change the default # of frames to extract for the next step.
(3) Extract video frames 📹 to annotate
deeplabcut.extract_frames(
    config_path,
    mode="automatic",
    algo="kmeans",
    userfeedback=False,
)
NOTE: try to extract a few frames from many videos vs. a lot of frames from one video!
(4) Annotate Frames
deeplabcut.label_frames(config_path)
(5) Visually 👀 check annotated frames
deeplabcut.check_labels(
    config_path,
    draw_skeleton=False,
)
(6) Create the training dataset 🏋️♀️
deeplabcut.create_multianimaltraining_dataset(
    config_path,
    num_shuffles=1,
    net_type="dlcrnet_ms5",
)
(7) Train 🚂 the network
deeplabcut.train_network(
    config_path,
    saveiters=10000,
    maxiters=50000,
    allow_growth=True,
)
(8) Evaluate the network
deeplabcut.evaluate_network(
    config_path,
    plotting=True,
)
(9) Analyze a video (extracts detections and association costs)
deeplabcut.analyze_videos(
    config_path,
    [video],
    auto_track=True,
)
NOTE:
auto_track=Truewill complete steps 10-11 for you automatically so you get the “final” H5 file. Use the below steps if you need to change the parameters of tracking based on your dataset.
(10) Spatial and (locally) temporal grouping: Track body part assemblies frame-by-frame
deeplabcut.convert_detections2tracklets(
    config_path,
    [video],
    track_method="ellipse",
)
(11) Reconstruct full animal trajectories 📉 (tracks from tracklets)
deeplabcut.stitch_tracklets(
    config_path,
    [video],
    track_method="ellipse",
    min_length=5,
)
(12) Create a pretty video output 😎
deeplabcut.create_labeled_video(
    config_path,
    [video],
    color_by="individual",
    keypoints_only=False,
    trailpoints=10,
    draw_skeleton=False,
    track_method="ellipse",
)
Active learning#
Just like for single animals.
Return to readme.
