Training 🏋️♀️ your first DeepLabCut model#
Let’s build our first DeepLabCut model ✨!
How to start? (⏳15 min)#
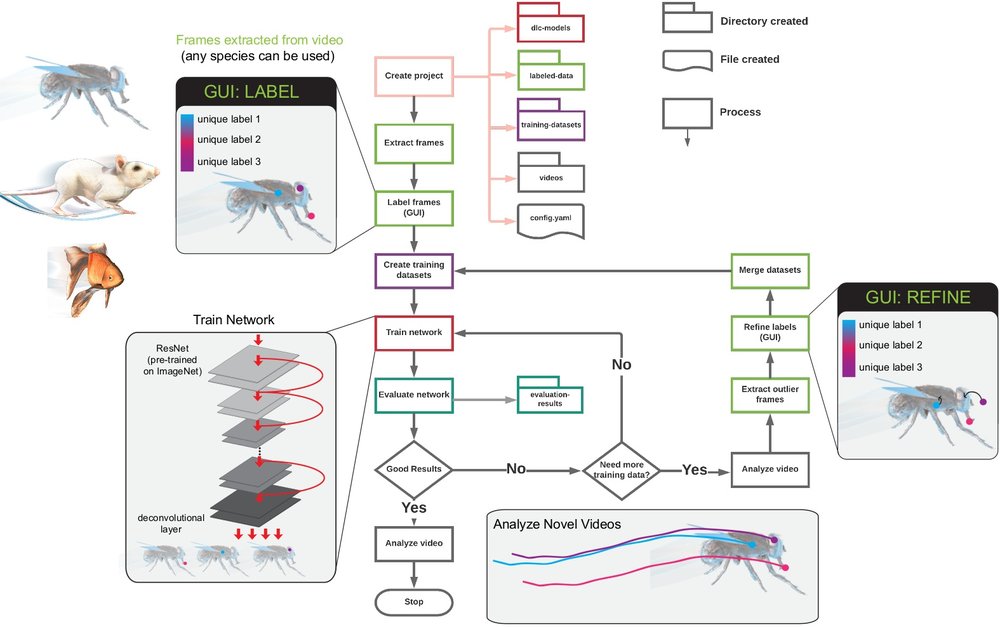
We highly recommend you to read this Protocol first [NMC+19]. Especially, Stages I-IX. In the figure below you can see the workflow of DeepLabCut :
Note
You can either work on your own data, if you want to perform pose estimation or you can use one of the demo datasets.
Think about your options and preferences (⏳5 min)#
The TAs can introduce you to a few different options as well as their merits.
Do you plan to run DLC on the CPU or do you have access to GPUs?
Training and evaluating DLC models on the CPU will be much slower, but it can be useful to test things locally
There are a few options to use GPUs for training and inference:
You may have a decent GPU in your laptop 💻, or
You may have access to a workstation 🚧 in the lab with GPUs, or
You may consider using GPUs in the cloud, for example with a Colab notebook
Are you comfortable with Python 🐍 scripting or would you prefer to use the GUI?
The DLC GUI provides a user-friendly interface that guides you through the model building process
Alternatively you can the Python API, which provides high-level well-documented Python functions for each of the model building steps
You can use Python scripting interactively in the Terminal (via
ipython), or you can use them to write your own scriptIf you plan to use GPU power via the Colab notebook, you will need to use the Python API
See DeepLabCut in the Terminal for a step-by-step guide 🗺
DeepLabCut’s data model (⏳10 min)#
Machine Learning projects rely on training data and create neural network weights that you want to use for analyzing your data.
Thus, for a given project you want to have a data structure on your computer that keeps track of configuration files, training data and neural network weights. This is what DeepLabCut’s data model addresses. A project is one folder 📂 (per project) that stores all those components in an organized fashion. A project directory has subdirectories: dlc-models, labeled-data, training-datasets, and videos.
You can even share these projects with others, and use them on different platforms. This comes in handy, as you may want to annotate with the GUI on your laptop, but then train 🏋️♀️ your model on a computer with a GPU (or on COLAB). Once you have a useful model, you can also share the project with others, or just export the neural network weights!
So let’s create our first project… and start labeling 🎉🎉!
🔥 Let’s start…#
The following summarises DeepLabCut’s single animal workflow. If your dataset involves multiple animals that look the same, please consult the maDLC user guide (however, be warned the workflow is more involved, as it adds additional steps; for educational purposes you could focus on a single animal project first, if you have never used DeepLabCut).
If you wish to use the Project Manager GUI (recommended for beginners), you can check out this guidance and video demos.
Creating a project and extracting frames (⏳30 min)#
The function create_new_project creates a new project directory, required subdirectories, and a basic project configuration file. Check DeepLabCut’s documentation for details.
deeplabcut.create_new_project('Name of the project', 'Name of the experimenter', ['Full path of video 1', 'Full path of video2', 'Full path of video3'], working_directory='Full path of the working directory', copy_videos=True/False, multianimal=True/False)
Next, open the config.yaml file from your project directory. Familiarise yourself with the meaning of the parameters. You must add the list of bodyparts (or points of interest) that you want to track. Do not have spaces in the names of bodyparts!
The function extract_frames extracts frames from all the videos in the project configuration file in order to create a training dataset. Have a look at the DeepLabCut documentation to decide:
how many frames to extract,
how to choose the frame extraction method that best suits your data,
how to control which videos to extract frames from,
whether to crop videos.
deeplabcut.extract_frames(config_path, mode='automatic/manual', algo='uniform/kmeans', userfeedback=False, crop=True/False)
Labeling Frames (⏳5 min - multiple hours)#
The function label_frames helps the user easily label all the extracted frames using an interactive graphical user interface (GUI). Check the documentation for pointers on how to use GUI.
deeplabcut.label_frames(config_path)
Check the quality! (⏳5 min)#
The function check_labels allows the user to check if the labels were created and stored correctly. For more information, including on what to do if you discover labeling errors, check the DLC docs!
deeplabcut.check_labels(config_path, visualizeindividuals=True/False)
Create a training dataset and pick model parameters#
You should continue on the machine/platform where you are going to train the network. You might have to edit your configuration file, so read the DeepLabCut documentation carefully to make sure you are ready to proceed.
The function create_training_dataset combines the labeled datasets from all the videos and splits them to create train and test datasets. Check the documentation to learn how to choose the most suitable pre-trained network and data augmentation method for your project.
Training your model (⏳1h - longer)#
The function train_network helps the user in training the network, using the parameters set in the pose_cfg.yaml file. Familiarise yourself with the meaning of those parameters and check the DLC documentation to learn:
how many iterations to train your model for,
how often to store weights and display loss,
how to restart training at a specific checkpoint.
Let’s Talk 📲#
What parameters should be picked?
for the most part the defaults are generalist parameters and will give you good performance
for some cases you can get better performance, which is best seen on videos/out-of-domain data. This is well illustrated in this recipe for bats by Jonas Håkansson (one of our TAs).
You can also check out Figure 8 in the Neuron Primer and this video, which compares different data augmentation methods on the same training set (this was also mentioned in the lecture today).
How much data should you label?
What should you consider when picking your neural network backbone? – Check out this recipe.
References
Tanmay Nath, Alexander Mathis, An Chi Chen, Amir Patel, Matthias Bethge, and Mackenzie Weygandt Mathis. Using DeepLabCut for 3d markerless pose estimation across species and behaviors. Nature Protocols, 14(7):2152–2176, June 2019. URL: https://rdcu.be/bHpHN, doi:10.1038/s41596-019-0176-0.